
In this tutorial we are going to learn the usage of findcontours and drawcontours functions in OpenCV Python. We will create code for doing this in real time using Webcam. This code will help you in further image processing and computer vision projects where finding contours or Objects be the first task before doing any further identification related task. Such as in Number Plate detection system or any similar OCR based projects. Where you need to extract each alphabet as separate object or contours. The findcontours functions have some calling variations in some of opencv versions. You can find the difference in this stack overflow question.
Learning Objectives:
Here is a quick learning Objective summary about today’s findcontours opencv python example as well as drawcontours opencv python example. So it makes clear that today we are specially focusing on two main functions from the OpenCV Library in Python which is cv2.findcontours and cv2.drawcontours. So here are the list of question we are going to answer in this tutorial
- access webcam in OpenCV Python
- show Image in OpenCV Python
- Convert RGB Image into GrayScale in OpenCV Python
- extract Objects in OpenCV Python
- draw contours on RGB Image in OpenCV Python
VideoCapture OpenCV Python
VideoCapture function in OpenCV is used to access webcam attached to the system. This can also detect USB webcam in Raspberry Pi. So if you are using Raspberry PI and doing Image processing in Raspberry PI with external USB Webcam then this code will also work there. Here is the code which will initialize webcam and display stream on the display screen.
import cv2
cap = cv2.VideoCapture(1) #webcam number from 0->onwards
while(True):
    # Capture frame-by-frame
    ret, frame = cap.read()
    cv2.imshow('frame',frame)
    if cv2.waitKey(1) & 0xFF == ord('q'):
        break

# When everything done, release the capture
cap.release()
cv2.destroyAllWindows()Code language: PHP (php)
The code will open a window which will have the title ‘frame’ and that frame will show the stream from the webcam. Which is basically just a frame grabbed from webcam and displayed with cv2.imshow function. The next line containing cv2.waitKey(1) function is important after cv2.imshow function. This will help you to quite or to come out of Infinite While Loop by pressing the ‘q‘ key from keyboard.
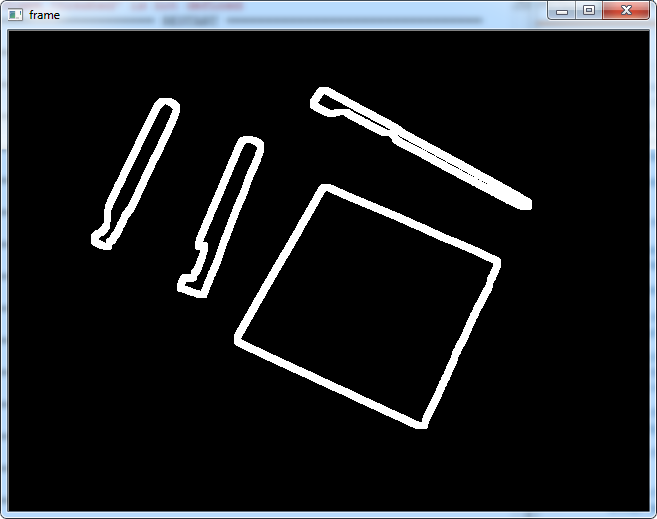
Preprocessing to get Binary Image
Before extracting our desired objects we need to do propper segmentation and pre-processing. The reason behind this is to obtain binary Image which holds nothing but our desired objects so that we do not get unwanted noisy object but only our desired on. There are different pre-processing, noise removal and binarization techniques available but we used simplest one to find bright mostly white objects. We focus on dark background and bright objects on that background. So if you have some other lighting conditions and/or background and object properties you may have to change this step according to your needs. But if you are following along and using similar environmental conditions then you are good to go.
Code
Now our code will look like this.
import numpy as np
import cv2

cap = cv2.VideoCapture(1)
kernel = np.ones((2,2),np.uint8)
while(True):
    # Capture frame-by-frame
    ret, frame = cap.read()
    # Our operations on the frame come here
    gray = cv2.cvtColor(frame, cv2.COLOR_BGR2GRAY)
    gray = cv2.GaussianBlur(gray, (7, 7), 0)
    gray= cv2.medianBlur(gray, 3)   #to remove salt and paper noise
    #to binary
    ret,thresh = cv2.threshold(gray,200,255,0)  #to detect white objects
    #to get outer boundery only
    thresh = cv2.morphologyEx(thresh, cv2.MORPH_GRADIENT, kernel)
    #to strength week pixels
    thresh = cv2.dilate(thresh,kernel,iterations = 5)

    # Display the resulting frame
    cv2.imshow('frame',thresh)
    if cv2.waitKey(1) & 0xFF == ord('q'):
        break

# When everything done, release the capture
cap.release()
cv2.destroyAllWindows()
Code language: PHP (php)
and result image will be something like this
Contour Detection
Now we are ready to extract these objects via contour analysis or contour detection method. As I have told you before that the OpenCV have findcontour function for this and the usage of that function is something as follows
im2,contours,hierarchy = cv2.findContours(thresh, cv2.RETR_EXTERNAL, cv2.CHAIN_APPROX_NONE)You provide a binary image to cv2.findContours function and it will return you 3 output variables according to openCV 3.4 version which currently I am using. If you get some error in this line of code. Just comfirm your OpenCV version and check the documentation to make sure how many returning parameters you have for that version. The most of the time the error which you may face could seem something as follows
ValueError: too many values to unpack
Draw Contours
Final step left, is to draw contours on the original color frame so that we can visualize in real time. So to draw them we have cv2.drawcontours function in opencv which could be used like this
if len(contours)>0:
   cv2.drawContours(frame, contours, -1, (0,255,0), 5)
Code language: CSS (css)
The last argument to this function is for line width and second last is for color of the contours boundary to draw with. Frist argument is image to draw on and second is the list of contours to draw.
Draw Rectangle around Biggest Object
Most of the time application is required to draw rectangle around the biggest object in the image. This will help us to detect the biggest object or biggest contour. We can apply max function to returns contours from cv2.findContours function and can draw rectangle like this
c = max(contours, key = cv2.contourArea)
x,y,w,h = cv2.boundingRect(c)
cv2.rectangle(frame,(x,y),(x+w,y+h),(255,0,0),2)
The final Image will now look like this

Final code for Contour Extraction
Here is complete code used in this tutorial
import numpy as np
import cv2

cap = cv2.VideoCapture(1)
kernel = np.ones((2,2),np.uint8)
while(True):
    # Capture frame-by-frame
    ret, frame = cap.read()


    # Our operations on the frame come here
    gray = cv2.cvtColor(frame, cv2.COLOR_BGR2GRAY)
    gray = cv2.GaussianBlur(gray, (7, 7), 0)
    gray= cv2.medianBlur(gray, 3)   #to remove salt and paper noise
    #to binary
    ret,thresh = cv2.threshold(gray,200,255,0)  #to detect white objects
    #to get outer boundery only
    thresh = cv2.morphologyEx(thresh, cv2.MORPH_GRADIENT, kernel)
    #to strength week pixels
    thresh = cv2.dilate(thresh,kernel,iterations = 5)
    im2,contours,hierarchy = cv2.findContours(thresh, cv2.RETR_EXTERNAL, cv2.CHAIN_APPROX_NONE)
    if len(contours)>0:
        cv2.drawContours(frame, contours, -1, (0,255,0), 5)
        # find the biggest countour (c) by the area
        c = max(contours, key = cv2.contourArea)
        x,y,w,h = cv2.boundingRect(c)

        # draw the biggest contour (c) in green
        cv2.rectangle(frame,(x,y),(x+w,y+h),(255,0,0),2)
    # Display the resulting frame
    cv2.imshow('frame',frame)
    if cv2.waitKey(1) & 0xFF == ord('q'):
        break

# When everything done, release the capture
cap.release()
cv2.destroyAllWindows()
Code language: PHP (php)
2 replies on “Real Time Contours Detection findcontours OpenCV Python”
line 11, in
gray = cv2.cvtColor(frame, cv2.COLOR_BGR2GRAY)
cv2.error: OpenCV(4.5.1) C:\Users\appveyor\AppData\Local\Temp\1\pip-req-build-6uw63ony\opencv\modules\imgproc\src\color.cpp:182: error: (-215:Assertion failed) !_src.empty() in function ‘cv::cvtColor’
ValueError: not enough values to unpack (expected 3, got 2)