
Counting frequency is very common problem. There are some well developed techniques to count frequency. We are going to use one of these techniques in this post to create our own DIY Frequency Meter using Arduino. We had chosen one of simplest and naive method used in this tachometer project for this post also we chosen Arduino because it is open source and because of its adoption among all kind of embedded developers. Arduino is also a great choice for this novice project for absolute beginners to get started and make your hand dirty with quick embedded development without being worried about actual hardware hacks. We use Proteous to simulate our environment and to effectively test accuracy of our meter.
Full source code is provided at end of the post.
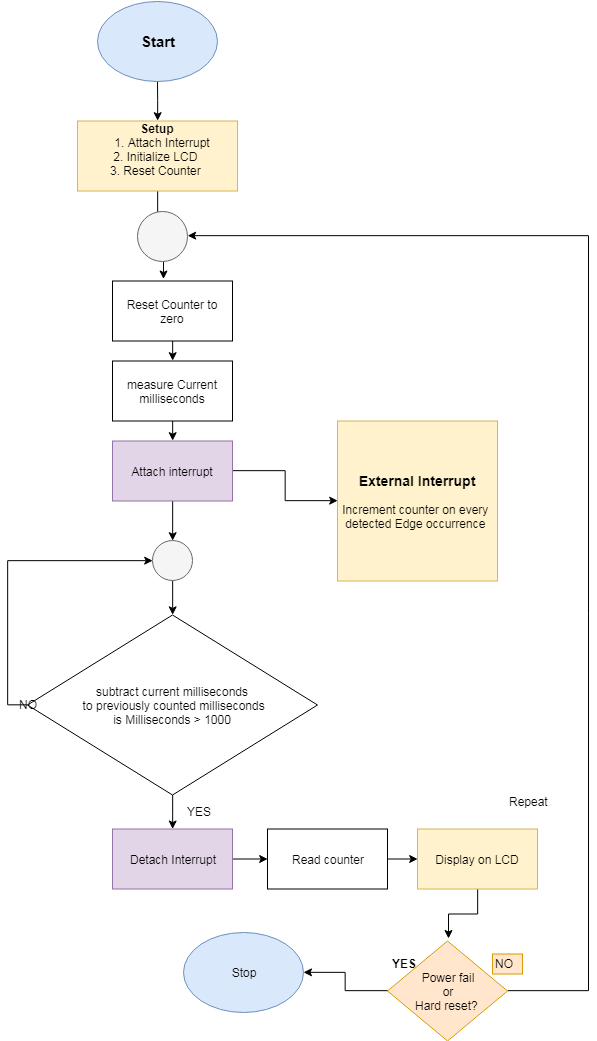
Algorithm for Frequency Counter
The algorithm to measure the frequency which we are going to use in this post is pretty straightforward. Let’s first define the frequency.
According to Wikipedia
Frequency is the number of occurrences of a repeating event per unit of time.
So it could be formulated as
f = 1/T
Where “T” is Time period of a unit cycle. So it means we can calculate the frequency with the help of time period. Or there could be a simpler solution as well. We know that the frequency is just a number of cycles per second so we can calculate how many cycles are passing through with in one second time period. To-do this we need two things
- One second timer
- Method to count Number of cycles.
Here is a quick link if you want to do it other way.
Flow Chart for Frequency Measurement
Circuit Diagram of Frequency Meter using Arduino
Here is Proteus based circuit diagram of Frequency Meter with Arduino and 16×2 Character LCD.

and this is working result of simulation

Source Code
// include the library code:
#include <LiquidCrystal.h>

// initialize the library with the numbers of the interface pins
LiquidCrystal lcd(6, 7, 10, 11, 12, 13);
int freqCounter = 0;
long preMillis = 0;

void isr() //interrupt service routine
{
  freqCounter++;
}

void printCounting(){
  lcd.setCursor(6, 1); //6th column and second row
  lcd.print((freqCounter/1000)%10);
  lcd.print((freqCounter/100)%10);
  lcd.print((freqCounter/10)%10);
  lcd.print(freqCounter%10);
  lcd.print("Hz");

}

void setup() {
   // set up the LCD's number of columns and rows:
  lcd.begin(16, 2);
  // Print a message to the LCD.
  lcd.print("Frequency Meter");
  printCounting();
  delay(10);
  attachInterrupt(0,isr,RISING);  //attaching the interrupt

}


void loop() {

 while((millis()-preMillis)<1000);
 detachInterrupt(0);           //detaches the interrupt
 printCounting();
 freqCounter = 0;
 preMillis = millis();
 attachInterrupt(0,isr,RISING);  //attaching the interrupt again

}Code language: PHP (php)